What Are Ice Dams and How Do They Destroy Roofs in the Finger Lakes Every Winter?
Key Takeaways
Ice dams form when heat escaping through your attic melts snow on the upper roof, and that meltwater refreezes at the cold eaves, creating a barrier that traps water.
The Finger Lakes region's repeated freeze-thaw cycles make ice dams more frequent and more destructive here than in consistently colder climates.
Ice dams do not just damage shingles. They cause rot in decking and rafters, destroy insulation, stain ceilings, and fuel mold growth inside the home.
The root cause is almost always an attic ventilation or insulation problem, not a roofing material problem.
Removing ice dams after they form is a short-term fix. Solving the underlying heat-loss problem is the only permanent solution.
Homes with aging roofs are significantly more vulnerable because deteriorated underlayment cannot hold back pooled water the way a healthy system can.
Introduction: The Winter Threat Most Finger Lakes Homeowners Underestimate
Ice dams look almost decorative at first. A thick ridge of ice at the roof's edge, icicles hanging from the gutters. From the street, it can look like a postcard.
Inside the house, a very different story is unfolding.
Water is pooling behind that ice ridge, finding the smallest gap in your shingles, working its way through the underlayment, soaking into your decking, and dripping into your attic insulation. By the time you see a water stain on your ceiling, the damage behind the walls has usually been building for weeks.
Ice dams are one of the most expensive and preventable sources of roof damage in upstate New York, and the Finger Lakes region's specific weather patterns make homes here especially vulnerable. This guide explains exactly what is happening, why it happens here so often, and what you can actually do about it.
What Is an Ice Dam, Exactly?
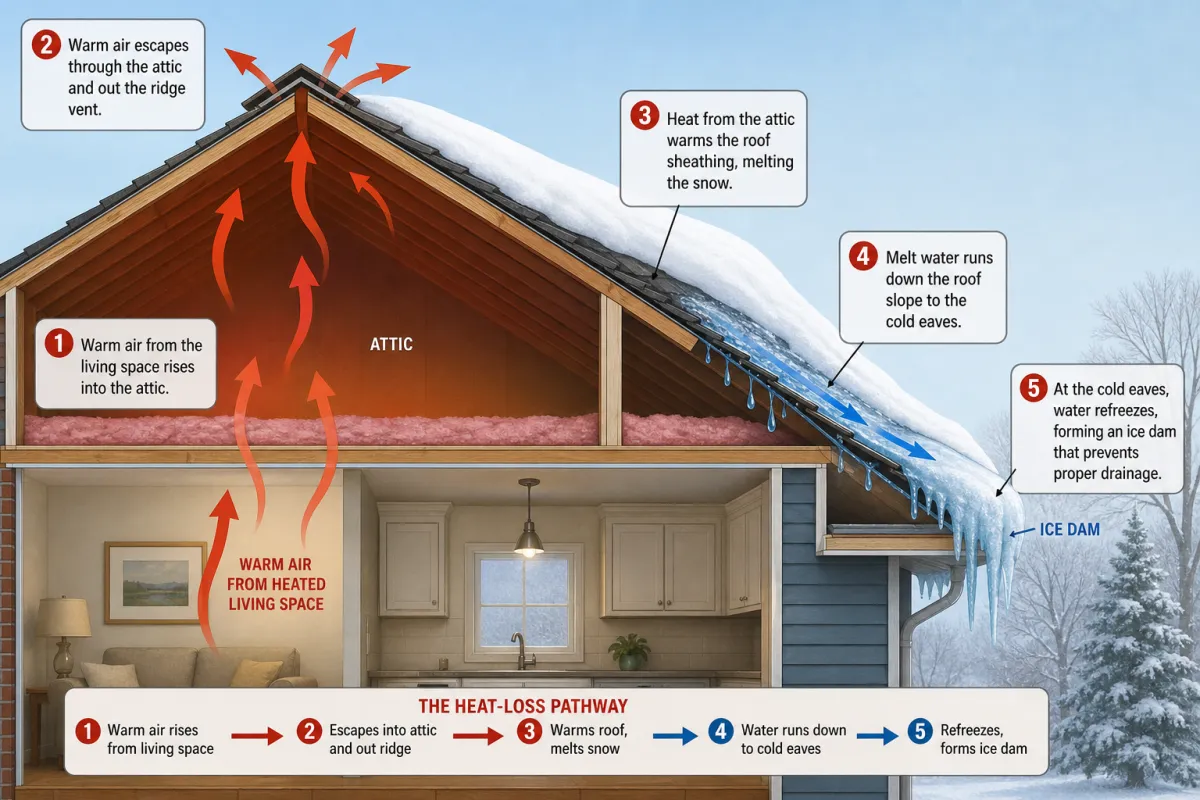
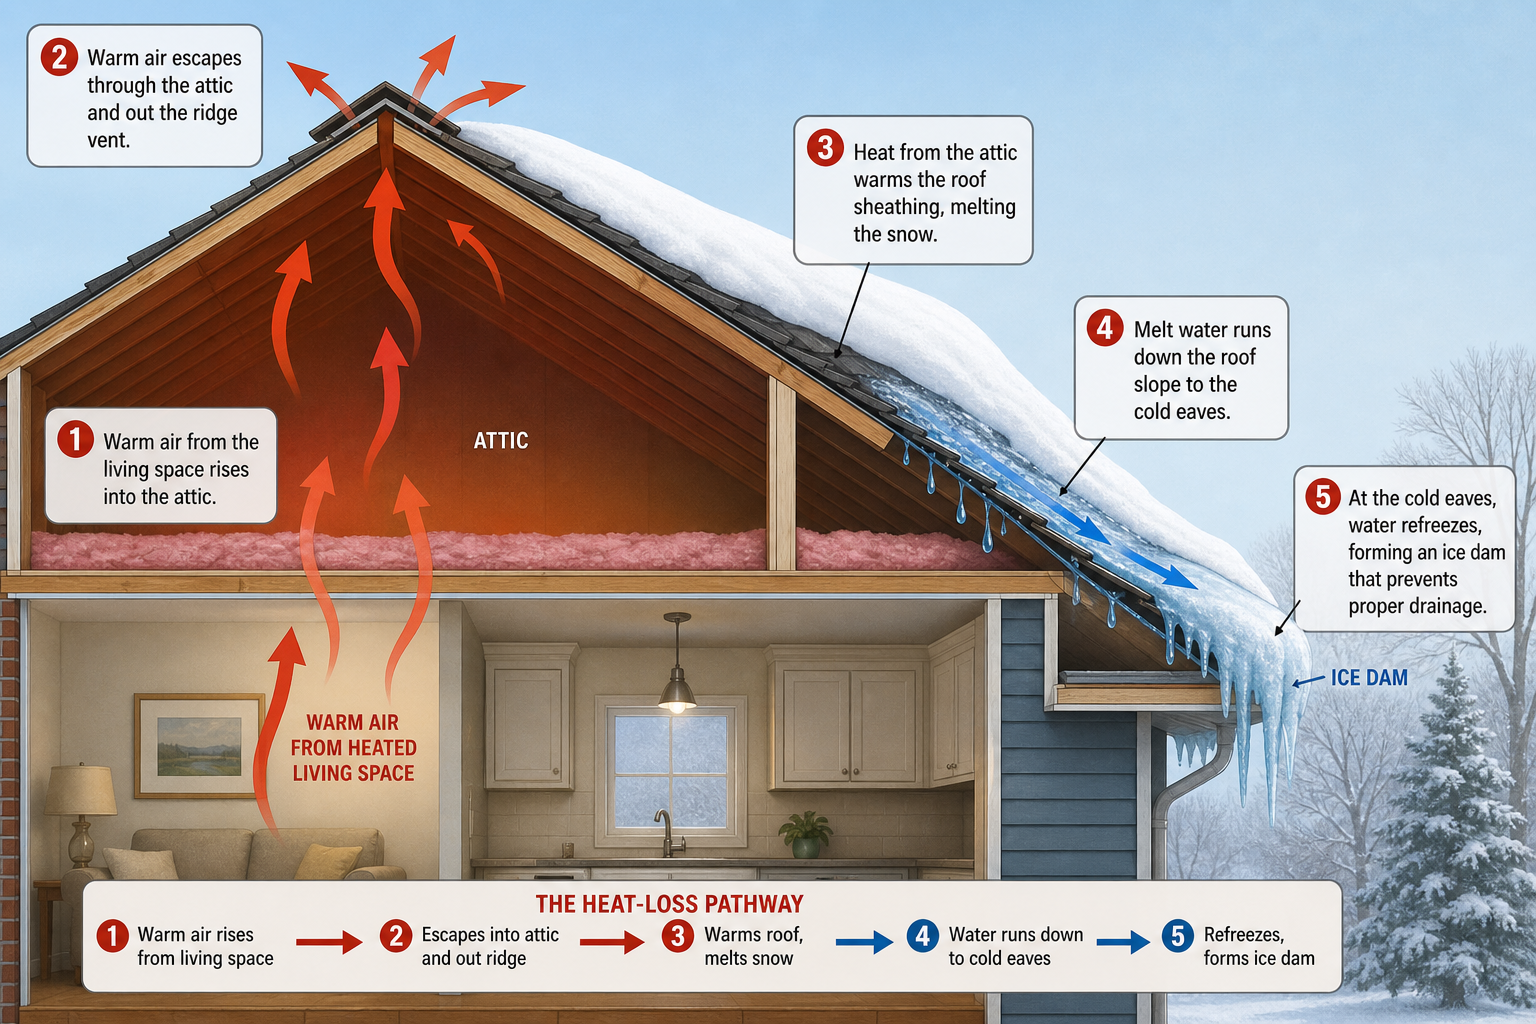
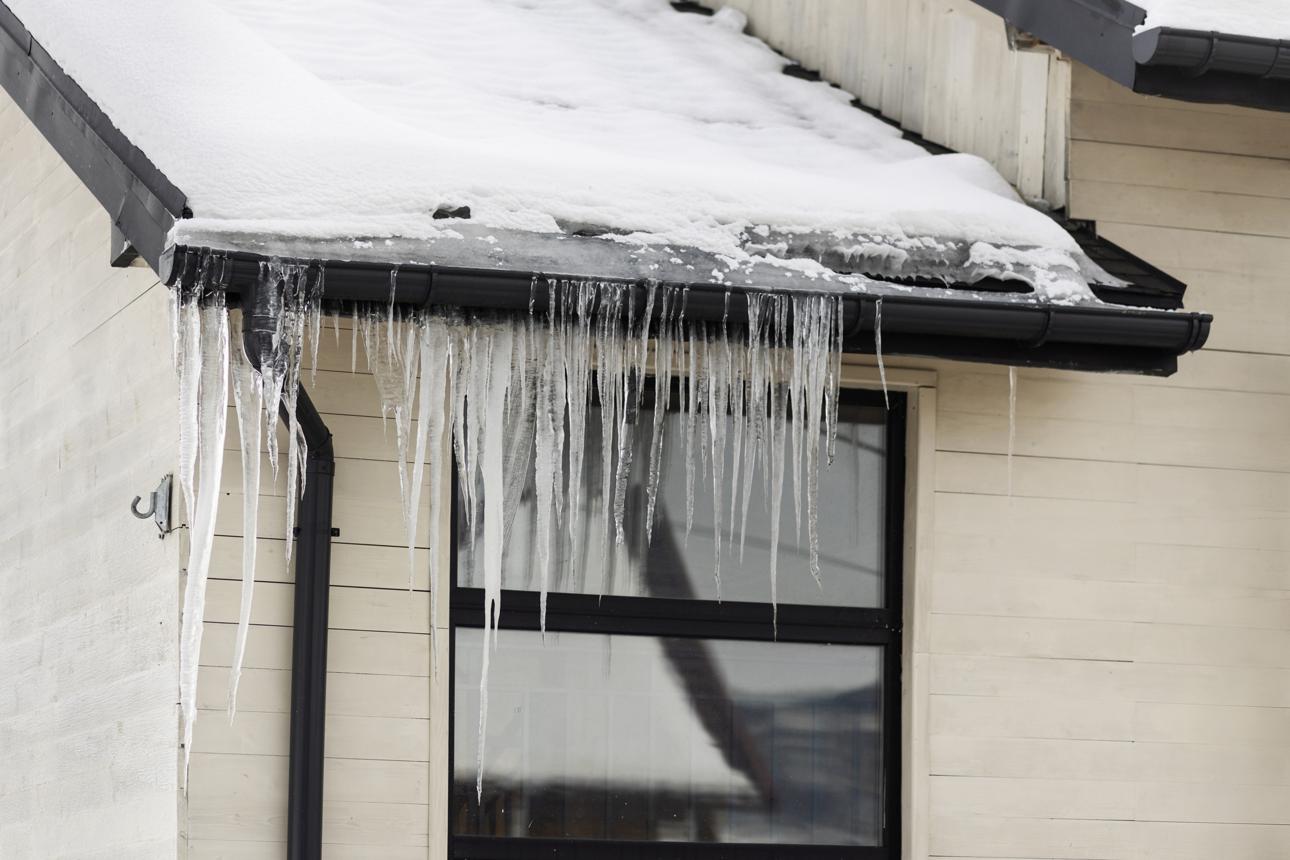
An ice dam is a ridge of ice that builds up along the lower edge of a sloped roof, typically at or just above the gutters. It blocks meltwater from draining off the roof. That backed-up water has nowhere to go, so it sits on the roof surface and eventually finds a way in.
The key thing to understand is that ice dams are not caused by cold weather. They are caused by uneven roof temperatures, and that unevenness is almost always a symptom of what is happening inside your attic.
Here is the sequence:
Snow accumulates on the roof.
Heat escaping from the living space below warms the upper sections of the roof deck.
Snow over the warm section melts, and water runs downward toward the eaves.
The eaves overhang the exterior wall, so they are not warmed by interior heat. They stay at or below freezing.
The meltwater hits the cold eave zone and refreezes, forming a ridge of ice.
More meltwater accumulates behind the ridge. Unable to drain, it pools.
Pooled water infiltrates under shingles, through the underlayment, and into the roof structure.
This cycle can repeat dozens of times over a single winter, and each cycle adds more ice to the dam and more water to the infiltration.
Why the Finger Lakes Makes This Worse Than Most Places
Consistent deep cold is actually less damaging to roofs than the freeze-thaw pattern the Finger Lakes sees every winter. Here is why.
In a climate that stays well below freezing for weeks at a time, the entire roof surface remains cold, meltwater does not form in significant quantities, and ice dams are far less likely to develop.
The Finger Lakes sits in a transitional zone. Temperatures routinely swing above and below freezing multiple times per week from November through March. A few days of 35 to 40 degree temperatures produce meltwater. An overnight drop to 20 degrees refreezes it. This cycle repeats constantly.
Each freeze-thaw cycle does two things: it adds mass to any existing ice dam, and it works more water into any existing crack or gap in the roofing system. By February, a dam that started as a thin ridge of ice in December may be 8 to 12 inches thick and stretching several feet up the roof slope.
The region also receives significant snowfall totals, particularly in the hills surrounding Seneca and Cayuga Lakes, where lake-effect and upslope snow events can drop heavy accumulations in short windows. More snow on the roof means more raw material for ice dam formation.
The 6 Ways Ice Dams Destroy Your Roof and Home
Ice dams do not cause a single type of damage. They trigger a cascade of failures across multiple systems in your home. Here is a detailed look at each one.
1. Shingle Damage and Lifting
As ice builds up along the eave, it expands into the spaces between shingles and under their edges. When that ice thaws and refreezes, it physically pries shingles upward and breaks the adhesive bond that holds them flat. Shingles that have been lifted or cracked by ice dam pressure are easy entry points for water during the next melt cycle, and they will not reseal properly once the bond has been broken.
2. Underlayment Failure
The underlayment is the waterproof membrane between your shingles and the decking. It is your second line of defense. When water pools behind an ice dam, it sits on the roof surface under hydrostatic pressure, which is very different from the sheeting water the underlayment was designed to handle. Older underlayment, which has become brittle or cracked over years of freeze-thaw stress, cannot resist this kind of sustained pressure. Water pushes through and reaches the decking.
Modern roofing installations include a specific product called an ice and water shield in the vulnerable eave zone for exactly this reason. Older roofs often do not have it, or have it only in a narrow strip that does not extend far enough up the slope.
3. Decking Rot and Structural Damage
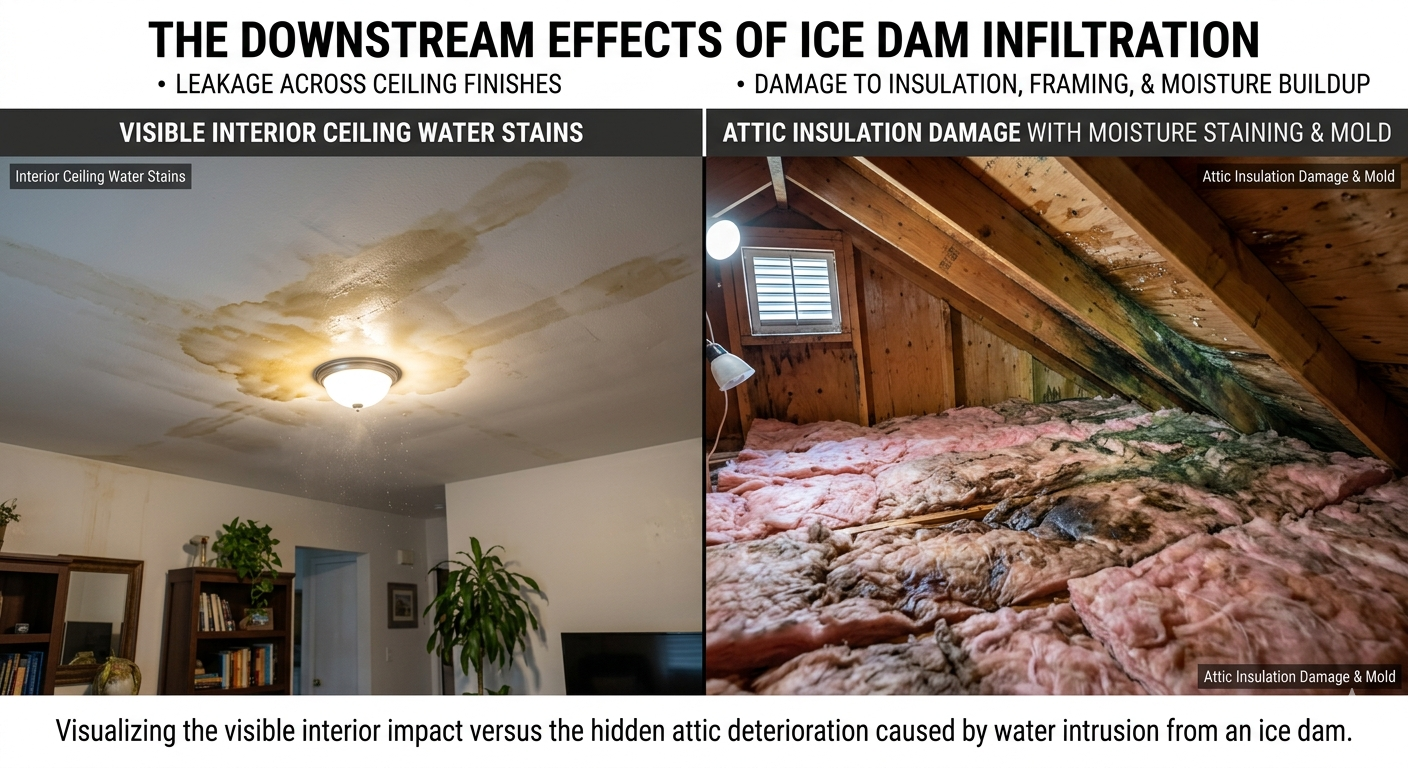
Once water gets past the underlayment, it soaks into the plywood or OSB decking. Wood that cycles through wet and dry conditions repeatedly rots from the inside out. By the time soft spots or rot are visible from the attic, structural damage has already occurred.
In severe cases, water tracks from the decking into the rafters and ridge board, compromising the load-bearing structure of the roof. This is the most expensive ice dam outcome and the one that most often turns a repair into a full replacement.
4. Insulation Damage
Attic insulation that gets wet loses most of its thermal performance. Fiberglass batts clump and settle. Blown-in cellulose compresses. Wet insulation also dries slowly in a cold attic, creating a prolonged period where mold spores have ideal conditions to establish.
Once insulation is saturated, it typically needs to be removed and replaced entirely, which adds a significant cost to what might have started as a roofing problem.
5. Ceiling and Interior Water Damage
The stained ceiling is usually the first sign a homeowner notices, but by the time water is dripping through the ceiling drywall, it has already traveled through the roof structure, the attic, and the ceiling assembly. Paint bubbles, drywall sags, and in serious cases, interior walls develop water stains as moisture tracks down framing members.
These interior repairs are not covered by standard roofing warranties. They are separate costs entirely.
6. Mold and Air Quality Problems
Sustained moisture in an attic space creates ideal conditions for mold growth. Attic mold is a serious health concern, particularly for households with respiratory conditions, and remediation is expensive. It also tends to recur if the underlying moisture problem (the ice dam cycle) is not resolved.
The Real Cause: It Is an Attic Problem, Not a Roofing Problem
This is the most important thing to understand about ice dams, and it is the piece of information that contractors who just want to sell you new shingles will skip over.
Ice dams are primarily caused by heat loss through the attic, not by roofing material failure.
The two attic conditions that drive ice dam formation are:
Inadequate insulation. If the floor of your attic is not insulated to code (R-49 to R-60 is the recommended range for Climate Zone 6, which covers most of upstate New York), heat from your living space rises into the attic and warms the roof deck from below.
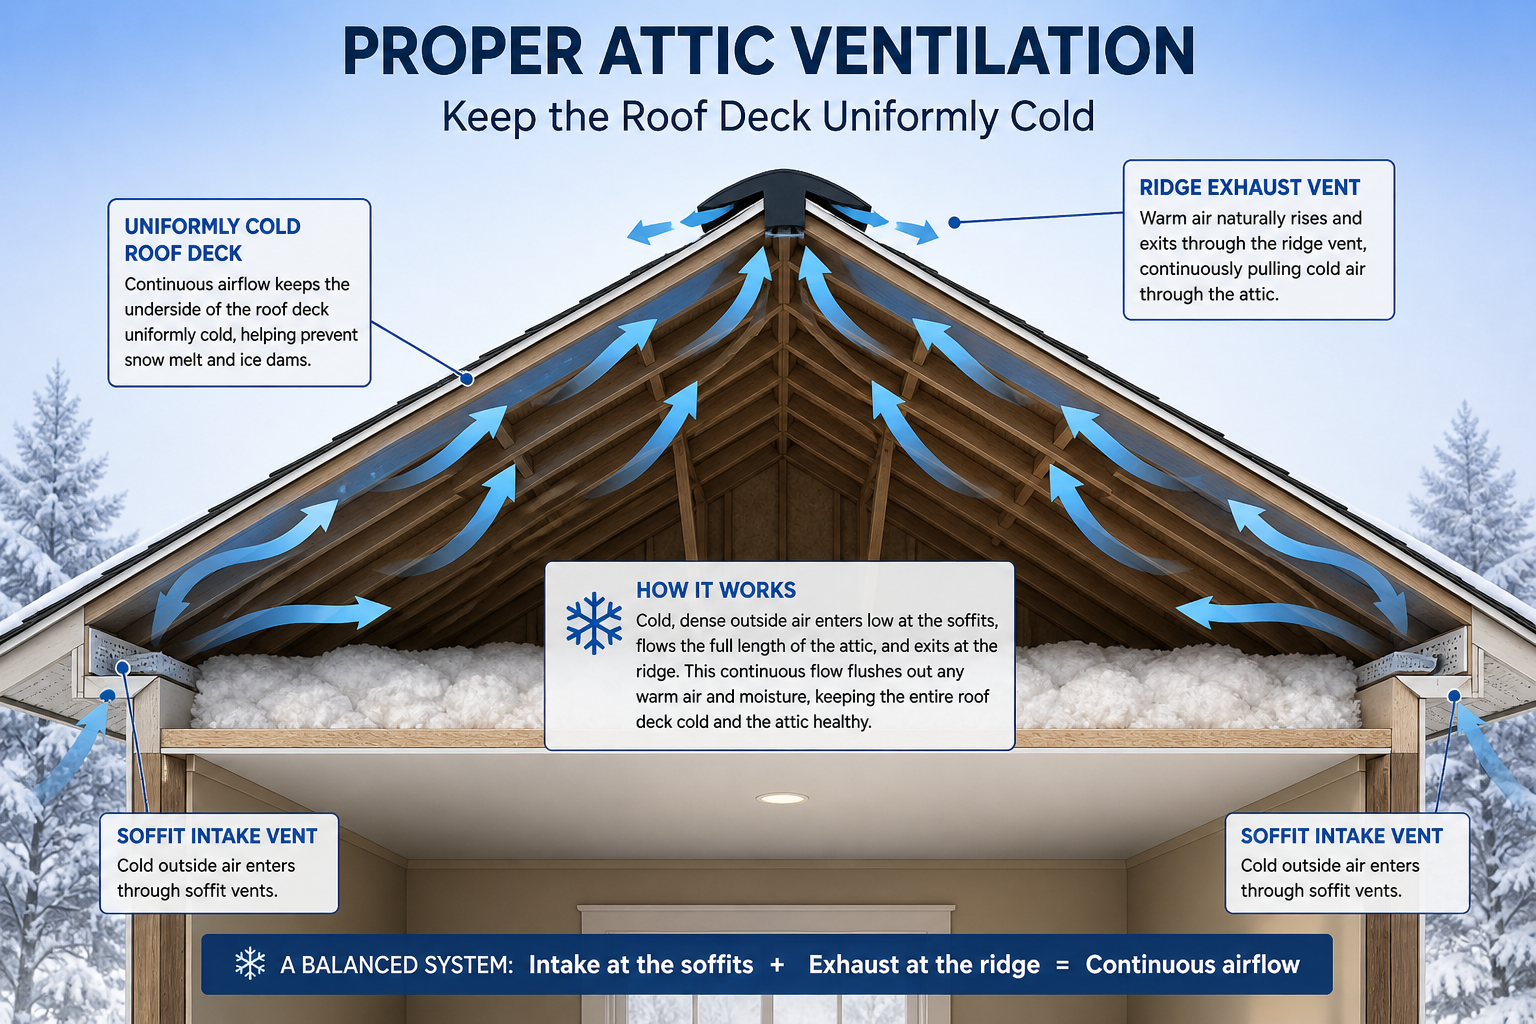
Inadequate ventilation. A properly ventilated attic allows cold outdoor air to flush through the space, keeping the underside of the roof deck close to outdoor temperature. When soffit vents are blocked by insulation, or ridge vents are absent or undersized, warm air cannot escape and accumulates against the roof deck.
When both of these problems exist together, which is common in older Finger Lakes homes built before modern energy codes, the upper roof runs significantly warmer than the eaves all winter long. That temperature differential is the engine that drives ice dam formation.
Replacing the shingles on a home with this attic condition will not stop ice dams. The new shingles will develop the same problem within a season or two.
What to Do When You Already Have an Ice Dam
If you are dealing with an active ice dam right now, here is what to do and what to avoid.
Safe Immediate Steps
Use a roof rake from the ground. A long-handled aluminum roof rake can pull accumulated snow off the lower 3 to 4 feet of your roof without you getting on a ladder. Removing the snow supply reduces the meltwater available to feed the dam. This is the safest DIY action you can take.
Apply calcium chloride in a nylon stocking. Laying a tube of calcium chloride ice melt across the dam, perpendicular to the eave, creates a drainage channel through the ice that lets backed-up water run off. Use calcium chloride, not rock salt or sodium chloride. Rock salt damages shingles and corrodes gutters and flashing.
Call a professional for steam removal. Contractors equipped with low-pressure steam equipment can remove ice dams safely without the chopping and chipping that damages shingles. This is the right call for large or severe dams.
What to Avoid
Do not chop or chip at ice dams with a hammer, axe, or chisel. The shingles are brittle in cold temperatures and chip easily. You will cause more damage than the dam.
Do not use a heat gun or open flame. This is a fire hazard and can damage roofing materials.
Do not get on a snow-covered or icy roof yourself. Falls from icy roofs are among the most common serious winter injuries. Leave roof-level ice dam work to professionals with proper safety equipment.
The Permanent Fix: What It Actually Takes
Removing an ice dam is not a solution. It is a temporary relief. The only permanent fix addresses the heat-loss problem in your attic.
Step 1: Air Sealing
Before adding more insulation, any air leaks in the attic floor need to be sealed. Common leak points include recessed light fixtures, attic hatches, plumbing and electrical penetrations, and gaps around chimneys. Even a small gap allows warm, moist air to rise directly into the attic, defeating the purpose of additional insulation.
Step 2: Increase Insulation to Current Code Standards
Bring attic insulation up to R-49 to R-60. In most Finger Lakes homes built before 1990, this means adding a significant amount of blown-in insulation over existing batts.
Step 3: Improve Attic Ventilation
A healthy attic needs both intake ventilation at the soffits and exhaust ventilation at the ridge. The two work together to flush cold outdoor air through the attic space continuously. A roofing contractor can assess whether your current ventilation system is balanced and adequate.
Step 4: Add Ice and Water Shield During the Next Roof Work
If your roof is due for replacement or significant repair, make sure the new installation includes a self-adhering ice and water shield membrane running from the eave edge up to at least 24 inches past the interior wall line. In many Finger Lakes homes, a 6-foot wide strip is appropriate given the local climate. This does not prevent ice dams, but it prevents the water behind an ice dam from infiltrating the roof structure.
How Ice Dams Interact With an Aging Roof
A newer roof with proper underlayment and ice and water shield installed in the eave zone can tolerate a moderate ice dam event without significant damage. The water pooling behind the dam is held back by the membrane while the homeowner addresses the immediate situation.
An older roof, particularly one with deteriorated underlayment, no ice and water shield, and shingles that have already lost much of their flexibility and adhesion, has almost no tolerance for pooled water. The first significant ice dam event can cause water infiltration that would not have affected a newer system at all.
This is one reason why roof repair and timely maintenance matters so much heading into winter. A roof that is borderline on shingle life and lacking proper eave protection is not just an aging asset. It is an active liability every time the temperature swings above freezing in January or February.
If your roof is approaching 15 to 20 years old, an inspection before winter is far less expensive than an emergency repair call in February when ice dam damage has worked its way through the ceiling.
Does Homeowner's Insurance Cover Ice Dam Damage?
This question comes up every winter, and the answer is: it depends on your policy and how the damage is characterized.
Most standard homeowner's policies cover sudden and accidental water damage. If an ice dam causes a roof leak that damages interior ceilings and walls in a single event, many policies will cover the interior damage.
What policies typically do not cover:
Damage resulting from long-term neglect or a roof that was already deteriorated
The cost of removing the ice dam itself
Preventive or corrective attic work like insulation or ventilation upgrades
Mold remediation in many cases
Document everything if you experience ice dam damage. Photograph the dam itself, the interior water intrusion, and any visible roof damage before any cleanup or repair work begins. That documentation is essential for a claim.
Protecting Your Home Before Next Winter
The time to address ice dam vulnerability is not in January when the dam is already forming. It is in the late summer and fall when attic inspections and roofing work can be done efficiently and at normal pricing rather than emergency rates.
A pre-winter roof inspection covers the specific vulnerabilities that make ice dams worse: eave zone underlayment condition, flashing integrity, shingle adhesion, and visible evidence of previous ice dam infiltration in the attic. LS Roofing's residential roofing services for Geneva and Waterloo homeowners include exactly this kind of preventive assessment, and identifying a problem in September is almost always less costly than addressing the damage it causes in February.
For homes where an inspection reveals that the roof is approaching end of life, considering a full roof replacement before winter means the new system goes on with proper ice and water shield, updated underlayment, and the full protection a Finger Lakes winter demands.
Summary: What Ice Dams Are Telling You
An ice dam is not just a winter nuisance. It is a diagnostic signal.
It is telling you that your attic is losing heat. It is telling you that your roof's eave zone is under sustained water pressure it may not be equipped to handle. And depending on the age and condition of your roof, it may be telling you that the next season without intervention will produce interior damage that far exceeds the cost of addressing the problem now.
The Finger Lakes climate is not going to stop producing freeze-thaw cycles. The winters here are what they are. But a well-insulated attic, a properly ventilated roof system, and a roofing assembly that includes adequate eave protection can make ice dam damage a problem your home is equipped to handle rather than one that catches you off guard every February.